 Sainsun Mylar Bags
Do you provide the dieline for my pouch?
Yes, free, drawn to the exact size you order. Send it to your designer, or send us a sketch or logo and our design service lays out the artwork for every panel.
Most reprints are not print errors. They are artwork decisions discovered too late — a logo under the zipper, a warning cut off by the seal, a colour that was never going to match. All of it is avoidable on the dieline.
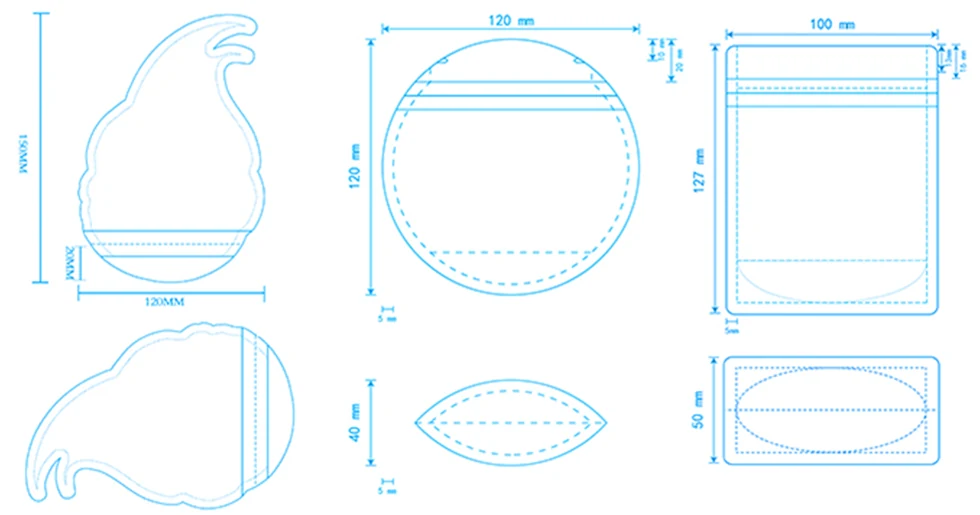
Before a pouch is printed, it is drawn as a flat outline: the dieline. It carries the finished dimensions, the fold and seal areas, the zipper position and the layered panels of a stand-up pouch. Every layout question is settled there, cheaply — and every one that is not gets discovered on a pallet.
We generate the dieline free with your quote, drawn to the exact size you order. Send it to your designer, or send us a sketch or logo and our design service lays out the panels for you.
Two numbers decide how much of your design survives the machine:
Where a design fails: a background that stops exactly at the cut line (white slivers on some pouches), and a legal statement placed close to the bottom seal (partly sealed over). Both are fixed in five minutes on the dieline and cost a full reprint if they are not.
A pouch is not a poster. When it fills, the flat artwork curves over a three-dimensional shape, the base folds under, and the side gussets compress.
Print is full colour, front and back, so the only limit is how you lay it out.
Brand colours are usually specified as Pantone. Print comes back as CMYK process, spot colours or a combination, and the achievable result depends on the substrate — a matte or metallised film reads differently from paper. Practical guidance:
| Item | What we need |
|---|---|
| Format | Layered file (AI, PDF or PSD) at print size — not a compressed JPEG |
| Resolution | 300 dpi at 100% size for any raster element |
| Colour | CMYK or Pantone references, with brand colours listed |
| Bleed | 3 mm past every cut line |
| Marks | Keep the dieline layer separate and switched off in the print version |
| Fonts | Outlined, or embedded in the PDF |
| Text | Minimum legible size on film — very small hairlines and reverse text fill in faster on film than on paper |
| Variable data | Batch, lot and QR fields as separate layers if they change per run |
On every custom job we produce a finished pouch for you to approve: size, film, finish, colour and closure, exactly as it will run. That is the moment to change things, because after approval the pouches are printed, laminated, cured and sealed, and the material is committed.
Two practical notes on approving a physical pouch:
Artwork approval is the gate the whole project waits on. Production is about 3–10 days after approval, and in practice the design stage takes longer than the print stage. Two things keep it short: send print-ready files rather than a logo dropped into a screenshot, and nominate one person to sign off rather than collecting opinions.
If the artwork is the reason for your delay, our design service lays out every panel from a sketch or logo at no charge — see what to ask a supplier for the other questions worth settling early.
Primary sources for the rules and test methods referred to in this guide:
The questions buyers ask most about this topic.
Yes, free, drawn to the exact size you order. Send it to your designer, or send us a sketch or logo and our design service lays out the artwork for every panel.
Allow about 3 mm of bleed past the cut line, and keep text and logos inside the safe area — typically 3–5 mm clear of the cut and seal lines.
A layered AI, PDF or PSD at print size in CMYK, with fonts outlined or embedded and images at 300 dpi. Keep the dieline on a separate layer and switch it off for printing.
Expect close rather than identical. Film, finish and metallised substrates all shift colour, and metallic film may need a white underprint. For critical brand colours, ask for a proof on the actual film.
Yes — on every custom order a finished pouch is produced for approval, covering size, film, finish, colour and closure, before bulk production starts.
We reply with pricing and a dieline, usually within 24 hours — free design service, samples approved before bulk production.
Chat with Joyce on WhatsAppor email [email protected]